 TrickExprt Android Apps, Games, Software & Tech Guides
Introduction
Android smartphones include many advanced features that are hidden from regular users. One of these features is Developer Options, a special menu that provides additional controls for testing apps, troubleshooting problems, and customizing certain system behaviors.
Learning how to enable Developer Options on Android is simple and does not require rooting your phone or installing third-party applications.
In this guide, you will learn how to enable Developer Options step by step on Android phones, including Samsung Galaxy, Google Pixel, Xiaomi, and Redmi devices. You will also discover useful developer settings and important safety tips.
What Are Developer Options on Android?
Developer Options is an advanced settings menu designed mainly for app developers and testers. It provides access to tools that help users test applications, diagnose technical problems, and adjust certain Android behaviors.
Some useful features available in Developer Options include:
- Window animation scale controls
- USB debugging
- Running services information on supported devices
- Stay awake while charging
- Advanced graphics and Bluetooth debugging options
The available features depend on your phone model and Android version. Some settings are intended only for technical users, so it is important to understand what an option does before changing it.
How to Enable Developer Options on Android
Follow these simple steps to activate Developer Options on most Android smartphones.
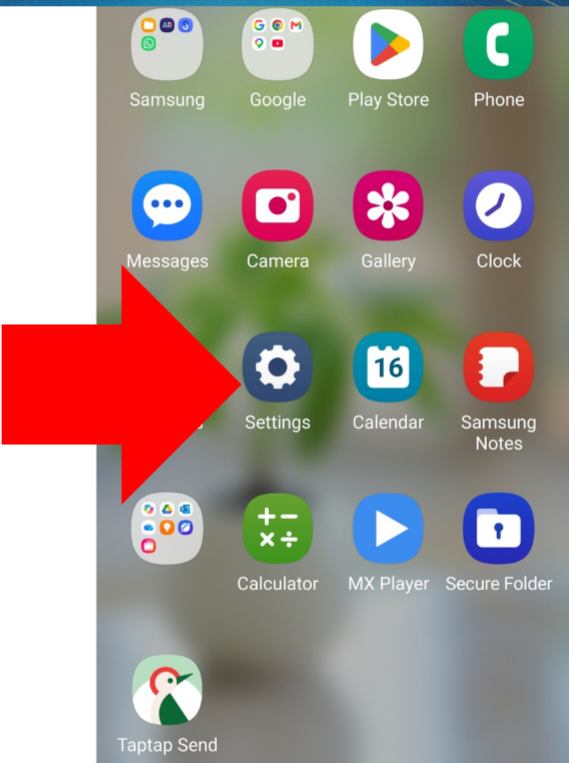
Step 1: Open Settings
Unlock your phone and open the Settings application. You can usually find it on your home screen or in the app drawer.
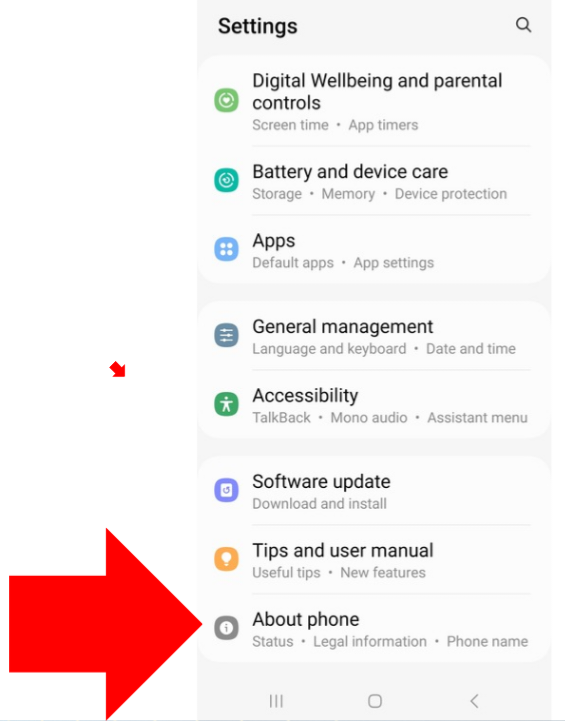
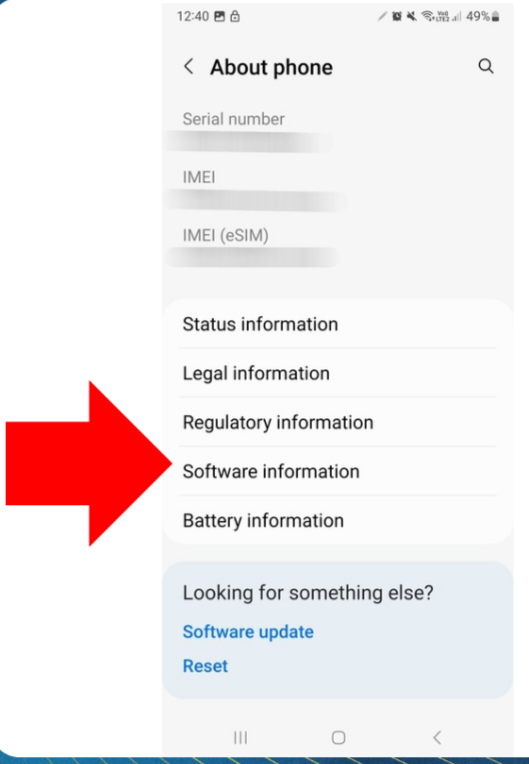
Step 2: Open About Phone
Scroll down and tap About phone or About device.
On some Android phones, you may need to open Software information to find the required option.
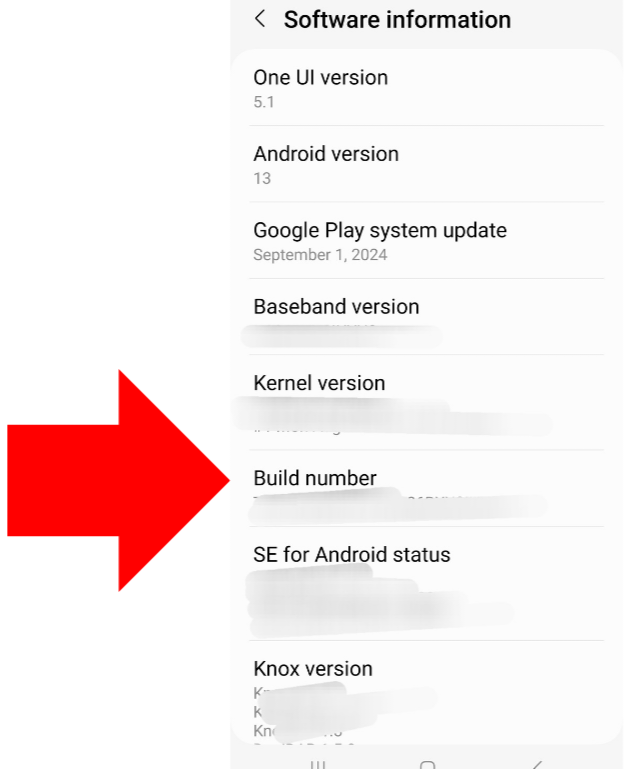
Step 3: Find Build Number
Look for an option called Build number.
Depending on your device, it may be located under Software information, Version information, or another similar menu.
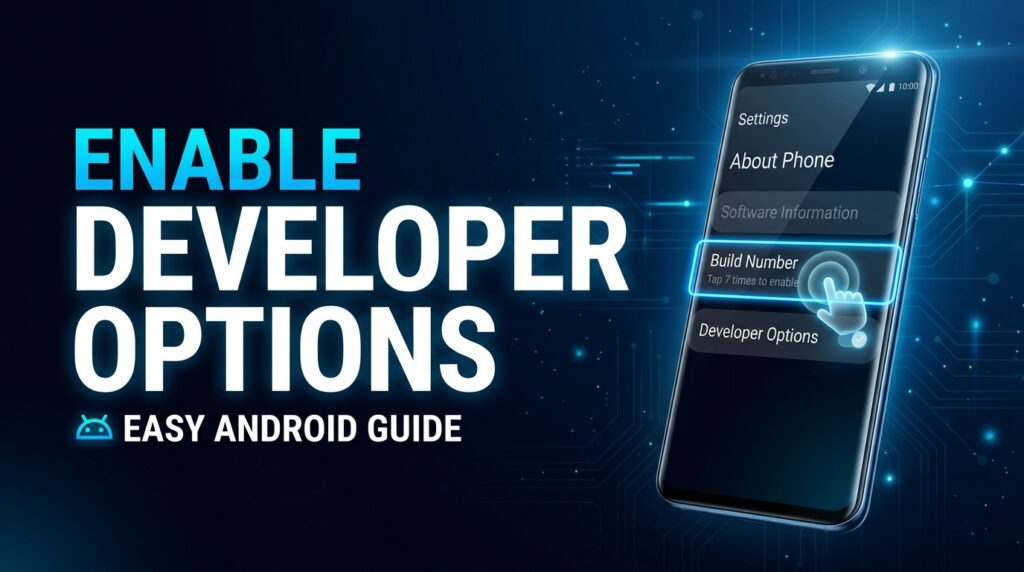
Step 4: Tap Build Number Seven Times
Tap Build number seven times in succession.
Your phone may ask you to enter your PIN, password, or screen lock pattern.
After completing the steps, you should see a confirmation message indicating that Developer Options has been enabled.
Step 5: Open Developer Options
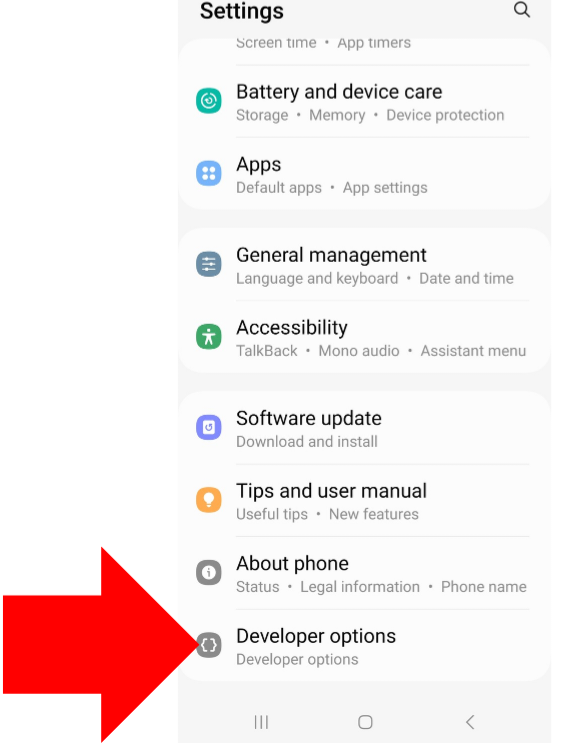
Return to the main Settings menu and look for Developer Options.
On different Android phones, it may appear under System, Additional settings, or another advanced settings menu.
You can also use the Settings search bar and type Developer Options to find it quickly.
Once the menu appears, tap it to explore the available features.
How to Enable Developer Options on Samsung Phones
Samsung Galaxy phones use Samsung’s One UI software, so some menu names may differ from other Android devices.
Follow these steps:
- Open Settings.
- Scroll down and tap About phone.
- Select Software information.
- Find Build number.
- Tap Build number seven times.
- Enter your screen lock credentials if requested.
- Return to Settings and search for Developer Options.
Developer Options should now be available on your Samsung phone.
The exact menu layout may vary depending on your Galaxy model and One UI version.
How to Enable Developer Options on Xiaomi and Redmi Phones
Xiaomi and Redmi phones may use HyperOS or MIUI, depending on the device and software version.
To enable Developer Options:
- Open Settings.
- Tap About phone.
- Find OS version, MIUI version, or the relevant software version entry.
- Tap the version entry repeatedly, usually seven times.
- Wait for the confirmation message.
- Return to Settings.
- Search for Developer Options or check Additional settings.
The exact procedure may differ between devices, so follow the instructions displayed on your phone.
How to Enable Developer Options on Google Pixel
Google Pixel phones generally use a version of Android with Google’s standard settings layout.
Follow these steps:
- Open Settings.
- Scroll down and select About phone.
- Locate Build number.
- Tap it seven times.
- Enter your screen lock PIN if requested.
- Return to Settings.
- Open System and look for Developer Options.
If the menu does not appear immediately, use the Settings search bar.
Best Developer Options to Know About
After enabling Developer Options, you may notice many advanced settings. You do not need to change all of them. The following options are useful to understand.
1. Window Animation Scale
This setting controls the speed of certain window animations.
Reducing the animation scale can make transitions appear quicker, although it does not increase your phone’s actual processing power.
2. Transition Animation Scale
Transition Animation Scale controls the speed of animations that occur when moving between screens or applications.
You can adjust it if you prefer shorter transitions.
3. Animator Duration Scale
This option affects the duration of certain interface animations.
Some users reduce animation durations to make the interface feel more responsive. However, the visual experience may feel different.
4. USB Debugging
USB debugging allows compatible development tools to communicate with your Android phone through a USB connection.
It is useful for developers who test applications or troubleshoot technical problems.
Keep USB debugging disabled when you do not need it. Only authorize computers you trust.
5. Stay Awake
On supported devices, the Stay awake option prevents the screen from turning off while the phone is charging.
This can be useful during application testing or demonstrations.
Be aware that keeping the screen on for long periods may increase power consumption and screen wear.
Is It Safe to Enable Developer Options?
Enabling Developer Options is generally safe. Simply activating the menu does not automatically damage your phone or erase your data.
However, changing unfamiliar settings can affect your device’s behavior, connectivity, performance, or security.
Follow these precautions:
- Do not change settings unless you understand their purpose.
- Keep USB debugging disabled when it is not required.
- Do not authorize unknown computers to access your phone.
- Avoid changing networking, graphics, or system debugging options without a clear reason.
- Make a note of any setting you change so you can restore its previous value if necessary.
For everyday smartphone use, you can enable Developer Options and leave the advanced settings unchanged.
How to Disable Developer Options
If you no longer need Developer Options, you can usually disable the menu through its main switch.
Follow these steps:
- Open Settings.
- Find Developer Options.
- Open the menu.
- Turn off the main Developer Options switch, if available.
The exact behavior depends on your Android version and manufacturer. Disabling the menu may not reset every setting you previously changed, so review any modifications you made.
Troubleshooting: Developer Options Not Appearing
If Developer Options does not appear after following the instructions, try these solutions.
Check the correct menu: Make sure you opened About phone or Software information and located the correct version or Build number entry.
Tap the correct item: Some phones require tapping Build number, while certain manufacturers use a software version entry.
Check for a confirmation message: Your phone may ask for your screen lock credentials or display a message confirming activation.
Search Settings: Type Developer Options into the Settings search bar.
Check device restrictions: Work-managed phones or devices with certain management policies may restrict access to developer features.
Consult manufacturer support: If the menu is still missing, check the official support instructions for your phone model.
Frequently Asked Questions
1. How many times do I need to tap Build number?
On most Android devices, you need to tap Build number seven times to enable Developer Options.
2. Does enabling Developer Options delete my data?
No. Enabling Developer Options does not normally erase your photos, applications, contacts, or other personal data.
3. Do I need to root my Android phone?
No. You can enable Developer Options on most Android phones without rooting the device.
4. Does Developer Options make Android faster?
Some animation settings can make transitions appear quicker. However, enabling Developer Options alone does not increase processing power or necessarily improve overall performance.
5. Is USB debugging safe?
USB debugging is useful for development and troubleshooting, but it should only be enabled when necessary. Never authorize a computer you do not trust.
6. Can I disable Developer Options later?
Yes. Most devices provide a switch inside the Developer Options menu. The location and behavior may vary depending on your Android version.
7. Why can’t I find Build number?
Build number may be located inside About phone, Software information, or another version-related menu. The exact location depends on the manufacturer.
Final Thoughts
Developer Options is a useful Android feature that provides access to advanced tools for application testing, troubleshooting, and interface customization.
You can enable it on most Android smartphones by locating Build number or the relevant software version entry and tapping it seven times.
Whether you use Samsung Galaxy, Google Pixel, Xiaomi, or Redmi, the process is usually straightforward. Remember to change advanced settings carefully and keep USB debugging disabled when you do not need it.
For more Android tutorials, smartphone tips, and troubleshooting guides, visit Trickexprt.com.
Related Android guides: increase Android battery life, free up Android storage, and fix Android app installation errors.